Updated: June 18, 2026
|
8 min read
Updated: June 18, 2026
|
8 min read
Pop Traffic Blacklist Management: A Stage-Based Framework for Pruning, Scaling, and Whitelist Transition
What is pop traffic blacklist management?
Pop traffic blacklist management is the process of excluding underperforming zones, sources, or traffic segments from a pop campaign using measured performance data. The role of the blacklist for pop ads campaign management is early waste control; the role of the whitelist is later-stage traffic selection. A buyer launches broad run-of-network traffic, cuts bleeder zones after enough spend, then moves proven subIDs into a whitelist run.
In practice, blacklist and whitelist are not rival tactics. They are different campaign stages. A blacklist protects the test budget while the funnel is still learning. A whitelist protects margin once the winning inventory is already visible in the data.
Why blacklist management matters in pop campaigns
A flat source average hides the few zones that are actually killing the campaign. In pop, variance sits at the placement level, so one bad cluster of subIDs can drag a decent source below target before you notice.
That is why zone blacklist work matters more in pop than in slower, higher-intent formats. Spend burns fast, feed cleanup happens fast, and bad inventory keeps re-entering broad traffic if you stay lazy with source scrub. The math changes because cutting a whole source throws away winners with the losers. SubID visibility is the difference between “source looks bad” and “three zones are bad”.
Minimum tracking granularity before any blacklist decisions
Data sufficiency for blacklist decisions starts at the zone level, not the campaign level. The minimum useful split is zone or subID, then source, GEO, device, OS, browser, and only later daypart. If mobile Android traffic is losing money inside one source while desktop Windows is profitable, a merged source view produces the wrong cut.
Which traffic dimensions should you evaluate first when blacklisting pop traffic?
Traffic dimensions should be evaluated in this order for pop blacklisting: zone or subID first, then source, GEO, device, OS, browser, and daypart last. Zone drives most decisions because that is where waste clusters. In Tier-2 iGaming, device or OS splits often explain why one zone converts on Android but fails on iOS, while daypart usually needs more volume before it becomes actionable.
One benchmark worth keeping:
roughly 80% of blacklist decisions live at the zone level.
Do not merge zone into source. Do not merge mobile and desktop early. Do not roll iOS and Android together inside a funnel bundle unless you want blended numbers that tell you nothing useful.
Using external trackers and source-level reporting
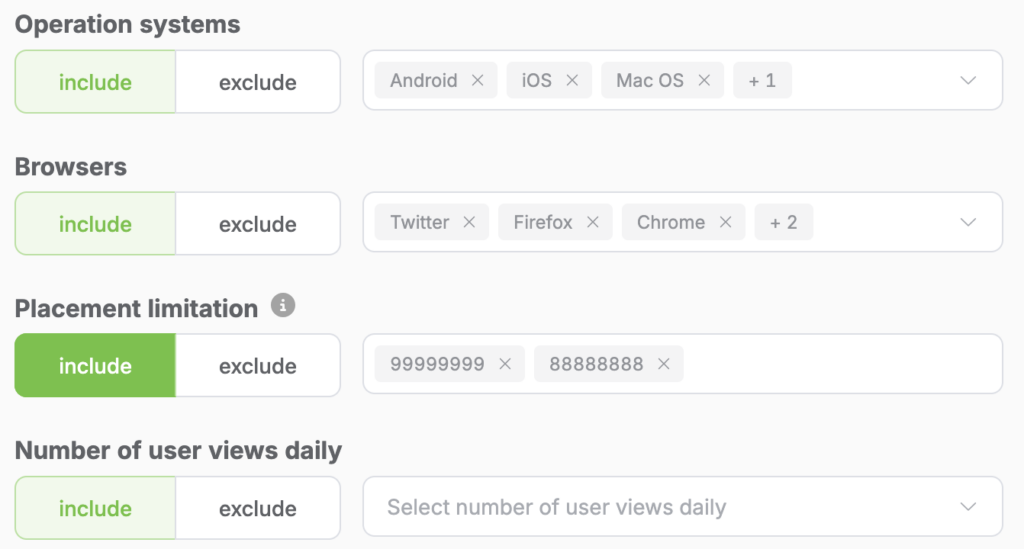
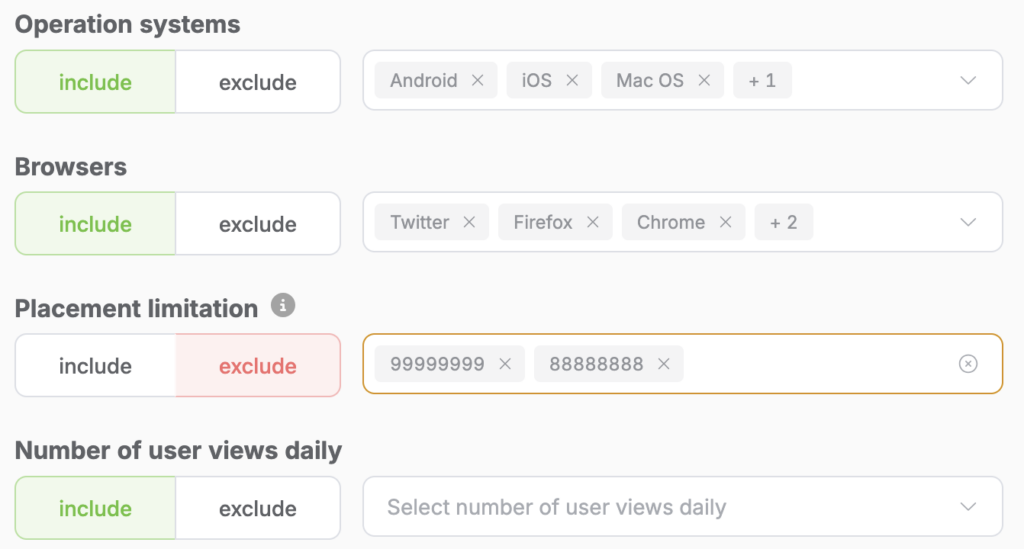
If you are still reading placement pruning from the network dashboard alone, the blacklist is already compromised. External trackers such as Voluum, Binom, RedTrack, and Keitaro let you split source, zone, prelander, device, and post-click behavior in one view.
A practical minimum setup:
- Pass subID or zone ID into the tracker.
- Split reporting by GEO, device, and OS from day one.
- Match source-level cost with postback conversions and visit quality.
- Keep browser visible, but treat it as a bot-pattern check before a primary cut signal.
That setup prevents the most common mistake: blacklisting a source because the traffic pour looked weak, when the real problem was six bleeder zones on Android. A network that fits a CPA-first Tier-2 strategy, such as Remoby (push and pop network with direct publisher relationships in Tier-2 and Tier-3 GEOs), is useful only if the tracker reads the same segmentation cleanly.
Blacklist-first workflow for a new pop campaign
Blacklist-first workflow for a new pop campaign starts broad, protects learning, and cuts only after segments reach enough spend or impression depth. The sequence is launch broad, collect subID-level data, run an early cut pass on obvious waste, stabilize surviving segments, and only then promote repeat winners. Broad pop traffic typically touches 200 zones on launch, but only 20-30 deserve real scale after two pruning passes.
Use this sequence:
- Launch broad run-of-network with prior GEO blacklists only.
- Let the campaign touch enough zones to expose variance.
- Run the first exclusion pass at 12-24 hours for obvious zero-value traffic.
- Hold thin-sample zones even if they look poor.
- Run a second pass on spend vs target CPA.
- Promote only repeat winners, not one-day spikes.
In a representative Tier-2 iGaming campaign with a $4 CPA target, the first three days spent about $300 across roughly 200 zones. The first passes cut zones with 3,000+ impressions and zero conversions, leaving about 160, then 120, then near 90 active zones by day seven.
Metrics and threshold rules for hold, blacklist, whitelist, and re-test decisions
Metrics for excluding a pop zone should combine spend, conversion count, CR relative to campaign average, and visit-quality checks. A zone should not be cut on CTR alone. A zone with low CTR but target CPA can stay; a zone with 3,000 impressions, zero conversions, and poor click-to-visit quality should go.

The important variable is not the exact number — it is the payout context. A $4 CPA iGaming offer in Tier-2 is less tolerant of long learning than a $40 finance lead.
Blacklist-first vs whitelist-led by campaign stage
Most buyers treat blacklist and whitelist as preferences. They are campaign structures, and the better choice depends on how much of the inventory you already understand.
| Campaign stage | Blacklist-first role | Whitelist-led role |
| Launch | Preserve exploration, cut obvious waste | Too early — kills discovery |
| Stabilization | Clean weak zones, isolate device/GEO winners | Build candidate win list |
| Scale | Marginal gains shrink, re-buying junk becomes expensive | Lock proven inventory, control variance |
| Rule of thumb | Use blacklist early | Use whitelist once winners repeat |
Once the funnel is proven, broad-minus-blacklist often becomes an expensive way to keep buying marginal zones daily. That is the point where a whitelist run stops being restrictive and starts being efficient.
When to switch from blacklist pruning to whitelist management
Switch from blacklist-first to whitelist management when pruning passes stop producing meaningful CPA gains, a small group of zones consistently drives most conversions, and the blended CPA sits close to target across several review windows. A practical trigger: under 5% CPA improvement from each new pruning pass, with the top 15–20% of zones generating most conversions. After day 10, broad traffic often keeps re-buying marginal inventory while the same proven subIDs do the real work.
This transition matters more than most blacklist guides admit. If the campaign is still finding new winners, stay broader. If the surviving inventory is already clear, lock the win list and stop paying discovery costs twice. One rule worth keeping: if blended CPA is within 10–15% of target for several days and fresh auctions are mostly junk, the blacklist has taught you what it can teach.
Decision tree: more pruning or a whitelist-led scale plan?
Whitelist-vs-pruning decisions should follow three checks: are pruning gains still material, are winners concentrated, and is broad traffic mostly re-buying weak inventory. If more cuts improve CPA by only 3% while the top 20 zones drive 70% of conversions, the next bottleneck is campaign structure, not list size.
Use this decision tree:

How whitelist-led scaling works after the switch
The mistake here is going full whitelist and killing discovery completely. Better structure is two campaigns: one whitelist run for stable margin, one reduced-budget broad campaign for subID mining.
Stage 1 is launch filtering. Stage 2 is stabilization. Stage 3 is whitelist-led scaling. The broad campaign becomes a research budget, not the main volume driver.
A common split is 70–90% of budget into the whitelist campaign once winners repeat, with the rest kept for discovery. Bid up the win list carefully, bid down marginal zones instead of cutting them when they still clear payback, and update the whitelist only after repeated performance windows. That keeps the whitelist run tight without freezing it.
Review cadence, decay, and reset rules for blacklists and whitelists
Review cadence for pop traffic rules should be daily in the first week, then weekly once the campaign stabilizes, with a forced review every $500–$1,000 of spend. Full resets belong to major changes; incremental updates belong to routine pruning. A new GEO means reset; a minor bid tweak means update the current lists.
Use these reset rules:
- Incremental update: daily zone cuts, adding proven winners, minor bid changes.
- Full reset: offer swap, major creative or prelander rebuild, bid model change, new GEO.
- Borderline case: mobile-to-desktop shift resets; OS narrowing inside the same device often does not.
This is where copied lists age badly. A zone blacklist from one GEO does not transfer cleanly into another because the traffic mix changes underneath it (representative practitioner example).
Common pop-specific blacklist management mistakes
Common blacklist management mistakes in pop campaigns are thin-data cuts, merged segments, copied lists across incompatible setups, ignoring win-rate context, and freezing exploration too early. Each mistake distorts what the traffic actually is before the buyer decides what to do with it. Cutting a zone at 800 impressions with zero conversions on a volatile payout tells you almost nothing.
Two mistakes do the most damage:
- First, buyers merge source, device, and GEO too early. That hides where the real loss sits.
- Second, buyers over-trust blacklist growth as proof of progress. A longer cutlist is not a healthier campaign. It often means the test plan lacked structure from the start.
Worked example: from broad launch to whitelist lock
A representative Tier-2 iGaming campaign had a $4 CPA target. Days 1–3 spent about $300 and touched roughly 200 zones. Exclusion passes ran at hour 12 and 24, cutting around 40 zones that crossed 3,000 impressions with zero conversions.
Days 4–7 added about $400. The buyer cut zones above 2x CPA and trimmed low-CTR bleeders only when visit quality was also weak. Active inventory fell to around 90 zones. Two zones showed high CR early but stayed in hold because the sample was thin.
Days 8–12 added another $500. At that point, the top 25 zones were driving about 70% of conversions, and each new pruning pass was improving CPA by under 5%. The campaign split: a whitelist-only campaign took the proven zones, while the broad campaign stayed live on a reduced budget for discovery. The whitelist CPA settled about 10% under target.
FAQ for pop traffic blacklist management
Four questions that Remoby users ask the most.
A starting pop test often needs 50–100 zones at minimum, and 150–200 is common in broader Tier-2 runs before the first serious source scrub (industry benchmark).
CTR should not be a standalone cut rule in pop. Pair CTR with CPA, click-to-visit ratio, visit duration, or CR. Low CTR with target CPA is not a problem.
One blacklist should not be copied across GEOs without validation. Zone quality does not transfer cleanly, and a reused list often blocks traffic that never failed in the new market.
Daypart should stay visible, but it is lower priority than zone, device, OS, and GEO. It rarely drives the first useful cuts unless the campaign already has enough volume.